
How To
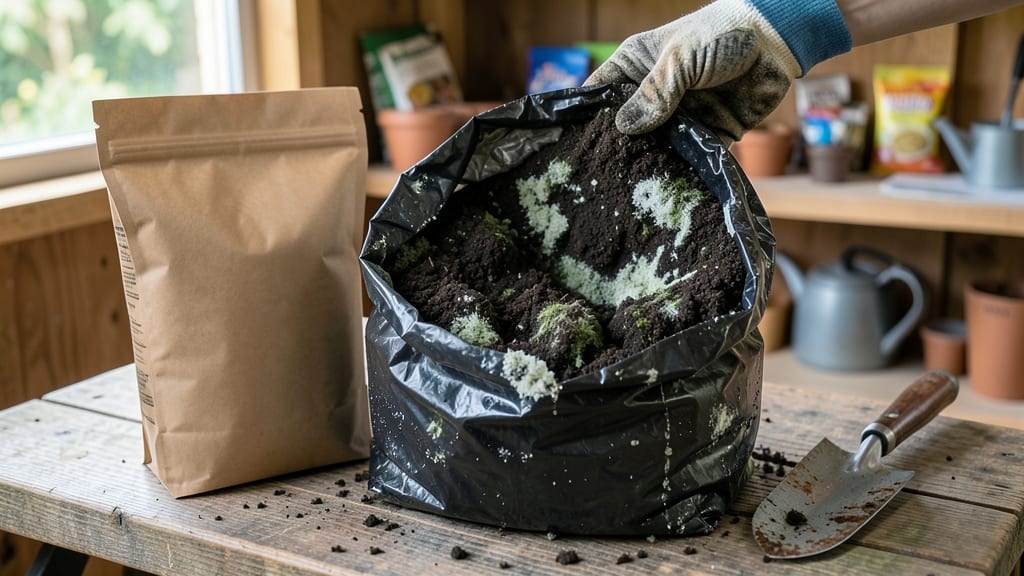
A moldy potting soil bag can ruin your planting plans faster than you can say "seedlings." 🌱 The good news? You can often save your soil—or at least minimize the damage—with just a few simple steps.
I’ve rescued more bags than I’d like to admit, and the key is acting fast before the mold spreads.
Mold thrives in damp, sealed bags where airflow is trapped. That’s why checking expiration dates and storing soil in ventilated containers (like food-grade buckets with holes) makes all the difference. If you’ve already got a moldy bag, don’t toss it yet—some soils can still be salvaged with the right approach.
Here’s the game-changer: sterilize the soil by baking it at 200°F for 30 minutes to kill mold spores, or mix it with fresh soil in a 1:3 ratio. Just avoid using moldy soil for edible plants—safety first! With these steps, you’ll turn a potential disaster into a foolproof planting solution.
For long-term storage, keep bags in a cool, dry place and reseal them tightly after opening. A little prevention now means no more wasted soil and happier plants down the road. Let’s get your garden back on track!
The Hidden Triggers Behind Fungal Growth
Few things are more frustrating than opening a bag of potting soil only to find it covered in mold—especially when you’re eager to plant. But why does this happen? The culprits are often a mix of environmental factors, storage mistakes, and even the soil’s natural composition.
Understanding these triggers can help you prevent future moldy soil and keep your gardening supplies fresh. Let’s break down the science behind the problem.
Mold thrives in damp, oxygen-deprived environments. When potting soil is exposed to prolonged moisture—whether from rain, humidity, or even condensation inside a sealed bag—it creates the perfect breeding ground for fungal spores. Here’s why:
- Sealed Bags Trap Humidity: Many potting soil bags are airtight to preserve freshness, but this also traps moisture. Over time, condensation forms on the bag’s interior, soaking the soil and encouraging mold growth.
- High Humidity Levels: If stored in a damp basement, garage, or near a shower, the soil absorbs moisture from the air, accelerating fungal development.
- Poor Drainage in Soil Mixes: Some potting soils contain high amounts of peat moss or coconut coir, which retain water longer than perlite or vermiculite. Without proper aeration, excess moisture lingers, promoting mold.
Actionable Fix: Always store soil in a cool, dry place with good airflow. If repurposing a moldy bag, spread the soil in a thin layer to dry before reuse.
Mold spores are dormant in cold conditions but activate when temperatures rise. Warmth speeds up their growth cycle, turning a slightly damp bag into a fungal hotspot in days. Here’s the breakdown:
- Ideal Mold Growth Range: Fungi love temperatures between 77–86°F (25–30°C). Storing soil near heat sources (like radiators, ovens, or direct sunlight) creates a mold-friendly climate.
- Condensation from Temperature Shifts: Moving a bag from a cold garage to a warm kitchen causes moisture to condense inside, further fueling mold.
- Organic Matter Breakdown: Warmth accelerates the decomposition of organic materials in soil (like compost or bark), releasing heat and moisture that mold exploits.
Actionable Fix: Keep soil in a temperature-stable area, away from heaters or sunny windows. A basement or closet with consistent coolness is ideal.
Potting soil is packed with organic materials—compost, peat, bark, and plant residues—that mold loves to feast on. While these nutrients are great for plants, they can become a buffet for fungi if unchecked:
- Rich, Fresh Compost: Fresh compost is teeming with microbial activity, which can overheat and produce excess moisture. If the compost wasn’t fully cured before mixing, it may still be breaking down, creating mold-friendly conditions.
- Old or Expired Soil: Over time, organic matter in soil decomposes further, releasing more moisture and nutrients that mold can exploit. A bag sitting for months (or years) is at higher risk.
- Synthetic Fertilizers & Additives: Some soil blends include slow-release fertilizers or mycorrhizal fungi, which can unintentionally introduce spores or create imbalanced moisture levels.
Actionable Fix: Opt for sterilized or aged potting mixes if mold is a recurring issue. For homemade soil, mix in perlite or sand to improve drainage and reduce organic density.
Time and improper storage are silent mold enablers. Even high-quality soil can turn moldy if left unchecked:
- Oxygen Deprivation: Sealed bags cut off airflow, creating anaerobic (oxygen-free) pockets where mold spores outcompete beneficial bacteria. Without oxygen, aerobic microbes die off, leaving fungi to dominate.
- Slow Water Evaporation: In sealed bags, moisture has nowhere to go. Over weeks or months, this leads to hydrophobic mold (like Aspergillus or Penicillium), which thrives in stagnant water.
- Punctures & Contamination: Small tears in bags allow outside spores to infiltrate. Even a tiny hole can introduce mold from dust, tools, or other garden debris.
Actionable Fix: If you must store soil long-term, poke small holes in the bag for ventilation or transfer it to a breathable container (like a burlap sack). Use soil within 6–12 months for best results.
Sometimes, mold hitches a ride from external sources:
- Dirty Tools or Hands: Transferring soil with unsterilized gloves, trowels, or hands can introduce mold spores from other plants or compost piles.
- Low-Quality Additives: Cheap or poorly sourced amendments (like bark chips or worm castings) may already contain dormant mold spores.
- Cross-Contamination: Storing soil near moldy pots, old plant debris, or even damp cardboard boxes can spread spores through the air.
Actionable Fix: Sanitize tools with rubbing alcohol before handling soil. Buy from reputable suppliers and avoid mixing soil with visibly contaminated materials.
Revive Your Soil in 3 Steps
Now that you know why your potting soil bag might be moldy, let’s tackle the problem head-on with practical, plant-friendly solutions. Whether it’s excess moisture, poor storage, or old soil, these fixes will help you restore your growing medium and keep your plants thriving.
---
If your soil feels damp to the touch or smells musty, it’s likely suffering from too much moisture—the #1 cause of mold growth.
#### 🍳 Air It Out & Loosen the Soil 1. Empty the Bag – Carefully pour the soil into a clean container or directly into your pots (if the plants are ready for replanting).
2. Spread It Thin – Lay the soil out on a baking sheet, tray, or even a tarp in direct sunlight for 24–48 hours. This allows excess moisture to evaporate naturally.
3. Break Up Clumps – Use a fork or your hands to fluff the soil, improving airflow and preventing compacted, anaerobic pockets where mold loves to hide.
#### 🌡️ Speed Up Drying (If Needed) - Fan It Out – Place a small fan nearby to circulate air and speed up the drying process. - Bake It (Gently!) – For stubborn mold, spread the soil on a baking sheet and place it in a low oven (200°F or less) for 10–15 minutes. Check frequently to avoid overheating!
#### 💡 Pro Tip: If you’re in a hurry, mix in 10–20% perlite, vermiculite, or sand to improve drainage and prevent future moisture buildup.
---
If your soil has been sitting too long or shows visible mold spots, it may need a deeper cleanse.
#### 🔪 Sterilize with Heat or Chemicals 1. Microwave Method (Small Batches) – - Spread soil in a microwave-safe dish (no metal!) and zap it for 1–2 minutes on high. Stir and repeat until fully dry. - ⚠️ Warning: Overheating can kill beneficial microbes—test a small amount first.
2. Boiling Water Treatment (Large Batches) – - Pour boiling water over the soil in a bucket, stirring well. Let it sit for 10 minutes, then drain excess water. - Repeat if mold persists.
3. Hydrogen Peroxide Soak (Natural Option) – - Mix 1 part 3% hydrogen peroxide with 3 parts water in a bucket. - Submerge the soil and let it soak for 10–15 minutes, then drain and rinse with clean water.
#### ✨ Revive with Fresh Additives After sterilizing, mix in: - Compost (10–20%) for nutrients - Worm castings (5–10%) for microbial balance - Lime or sulfur (if soil pH is off)
---
An ounce of prevention is worth a pound of cure! Follow these tips to keep your potting soil mold-free.
#### 📊 Storage Solutions - Seal It Right – Use airtight containers (like buckets with lids) or ziplock bags with all air squeezed out before sealing. - Keep It Dry – Store soil in a cool, dry place (like a garage or basement), not near moisture sources (e.g., sinks, showers). - Add a Desiccant – Place a silica gel packet in the storage bag to absorb excess moisture.
#### 🌡️ Adjust Watering Habits - Test Before Watering – Stick your finger 1–2 inches deep into the soil.
If it’s damp, wait! - Use Well-Draining Pots – Ensure pots have drainage holes and saucers underneath to catch excess water. - Water at the Base – Avoid overhead watering, which can leave soil too soggy.
#### 🎯 Rotate Your Soil Supply - Use It Within 6 Months – Potting soil loses potency and can develop mold if stored too long. - Buy Smaller Bags – If you won’t use a large bag quickly, opt for 5–10 lb sizes instead of 40 lbs. - Label & Date It – Write the purchase date on the bag so you know when to refresh.
--- Final Thought: A little effort now saves you from a moldy mess later. Whether you’re drying it out, sterilizing it, or storing it smarter, these steps will keep your potting soil—and your plants—happy and healthy! 🌱
Frequently asked questions
Is it safe to use moldy potting soil for non-edible plants?
For ornamental plants, moldy soil can often be salvaged by drying it out or mixing it with fresh soil in a 1:3 ratio. However, avoid using it for vegetables, herbs, or fruits since mold spores may contain mycotoxins harmful to humans. Always sterilize first if you're unsure!
How can I tell if mold is just surface-level or deep in the bag?
Check for fuzzy green/black spots on the surface, but dig deeper—if the soil smells musty or feels damp 2+ inches down, the mold likely penetrates throughout. For severe cases, discard the entire bag to prevent spreading spores to healthy soil.
Will baking soil kill all mold spores, or will they return?
Baking at 200°F for 30 minutes kills active mold, but spores may linger. To prevent recurrence, store the sterilized soil in a dry, ventilated container with a desiccant packet. Recheck monthly for new growth.
Can I use vinegar to clean moldy potting soil?
Yes! Mix 1 part white vinegar with 3 parts water, soak the soil for 15 minutes, then rinse thoroughly. Vinegar’s acidity disrupts mold without harsh chemicals. For extra protection, add 1 cup of hydrogen peroxide per gallon of water afterward.
Why does my new potting soil bag get moldy within weeks?
Most commercial bags are sealed airtight to preserve freshness, but this traps moisture. Store opened bags in a cool, dry place with ventilation (like a burlap sack with holes) or transfer to an airtight container with a silica gel packet. Use within 3–6 months for best results.